1. 简介
该框架基于swagger2-2.9.2与SpringBoot-2.0.1版本进行搭建,兼容SpringBoot2.x以上版本,不兼容1.x版本,maven依赖如下:
	<dependency>
		<groupId>io.github.wilson-he</groupId>
		<artifactId>swagger2-spring-boot-starter</artifactId>
		<version>1.1.2</version>
	</dependency>
2. 配置
-
2.1 结构
为了让使用者更清晰的了解swagger各层次配置,该框架主要根据原swagger配置结构进行属性分层配置,结构树如下:- swagger
- print-init(extra)
- profiles
- enabled(extra)
- security-configuration
- properties(client-id,client-secret,scope-separator...)
- dockets(extra)
- docket-bean-A
- docket.properties
- docket-bean-B
- docket.properties
- ...
- docket-bean-A
- docket
- base-package
- path-mapping
- group-name
- host
- protocols
- consumers
- produces
- direct-model-substitutes
- api-info
- contact
- properties(name,email,url)
- properties(version,title.description,license...)
- contact
- security-contexts
- path-selectors
- method-selectors
- security-references
- reference
- scopes
- security-schemes
- api-key-list
- basic-auth-list
- oauth-list
- path-selectors
- include-patterns(extra)
- exclude-patterns(extra)
- global-parameter(extra)
- global-parameters
- - global-parameter[a].properties
- - global-parameter[b].properties
- response-message-language(extra)
- response-messages
- resources-provider(配置网关路由文档,需额外开启enable,可参考zuul配置-百度例子)
- swagger-resources
- name
- url
- swagger-version
- swagger-resources
- swagger
-
2.2 详解
标注了extra的皆为个人开发配置,非根据swagger原有配置转换而来,该简介主要对extra部分进行讲解。- swagger.print-init:是否在控制台输出各docket初始化的配置信息
- swagger.enabled:是否开启swagger自动化配置(不设置则默认初始化swagger docket)
- swagger.profiles:指定profile环境下才进行文档生成
- swagger.dockets:用于配置多个docket,属性配置同docket,同时配置swagger.docket将一起生效,example:
swagger: dockets: docket-user: base-package: com.github.wilson.web.controller.user docket-order: base-package: com.github.wilson.web.controller.order - swagger.docket.path-selectors:swagger-ui上的路径选择器
- include-patterns:路径显示样式
- exclude-patterns:路径隐藏样式
- swagger.docket.global-parameter:配置全局参数,若同时配置了global-parameters,global-parameters会将global-parameter也加到全局参数里
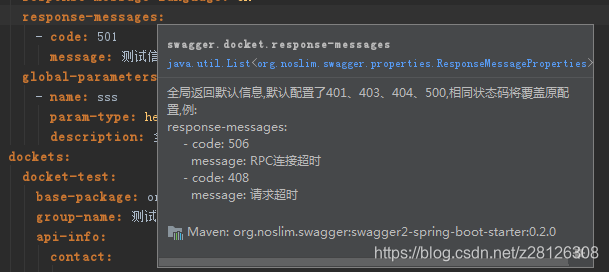
- swagger.docket.response-message-language:全局信息返回语言(cn,en),下图为cn信息
- swagger.print-init:是否在控制台输出各docket初始化的配置信息
3. 快速开始
启动类Application.java
package org.noslim.web;

import io.swagger.annotations.Api;
import io.swagger.annotations.ApiResponse;
import io.swagger.annotations.ApiResponses;
import org.springframework.boot.SpringApplication;
import org.springframework.boot.autoconfigure.SpringBootApplication;
import org.springframework.http.ResponseEntity;
import org.springframework.web.bind.annotation.GetMapping;
import org.springframework.web.bind.annotation.RestController;

@SpringBootApplication
@RestController
@Api
@ApiResponses({@ApiResponse(code = 200, message = "success", response = ResponseEntity.class)})
public class Application {
    public static void main(String[] args) {
        SpringApplication.run(Application.class);
    }

    @GetMapping("/index")
    public String index() {
        return "index";
    }

    @GetMapping("/home")
    public String home() {
        return "home";
    }

    @GetMapping("/home/test")
    public String homeTest() {
        return "test";
    }

    @GetMapping("/test")
    public String test() {
        return "test";
    }

    @GetMapping("/index/test")
    public String indexTest() {
        return "test";
    }

    @GetMapping("/index/test/a")
    public String indexTestA() {
        return "test";
    }
}
application.yml
swagger:
  print-init: true #非必需,默认true,控制台打印swagger url
  enabled: true #非必需,默认true
  docket:
    base-package: io.wilson.web   #必需
server:
  port: 8888   #非必需
  servlet:
    context-path: /test  #非必需
4. 多文档Docket配置yml-demo
-
application.yml
swagger: print-init: true enabled: true security-configuration: client-id: client-1 client-secret: secretA scope-separator: \, use-basic-authentication-with-access-code-grant: true docket: base-package: org.noslim.web group-name: origin direct-model-substitutes: [java.sql.Timestamp,java.lang.Long] path-selectors: include-patterns: [/home/*,/**] exclude-patterns: [/index/*] api-info: contact: name: Wilson email: 845023508@qq.com url: http://blog.csdn.net/z28126308/ security-contexts: - security-references: # 全局token Authorization权限设置 - reference: Authorization scopes: global: accessEverything # login接口无需Atoken path-selectors: "^(?!login).*$" security-schemes: # 全局token设置 api-key-list: - name: Authorization key-name: Authorization pass-as: header # oauth-list: # - name: oa1 # grant-types: [admin] # scopes: # scopeA: manage scope A response-message-language: cn response-messages: - code: 501 message: 测试信息 global-parameters: - name: sss param-type: header description: 全局header sss dockets: docket-test: base-package: org.noslim.web.test group-name: 测试模块 api-info: contact: name: Wilson email: 845023508@qq.com url: http://blog.csdn.net/z28126308/ response-messages: - code: 501 message: 测试 global-parameters: - name: token description: 令牌 param-type: header - name: userId description: 用户id param-type: query docket-order: api-info: contact: name: Wilson email: 845023508@qq.com url: http://blog.csdn.net/z28126308/ base-package: org.noslim.controller group-name: 订单模块 -
swagger-ui效果图
5. 配置提示
基本上非集合配置都提供了自动填充提示功能,效果图如下: 


6. zuul配置例子
-
application.yml
server: port: 8999 spring: application: name: api-docs zuul: routes: user-provider: path: /user-provider/** user-consumer: path: /user-consumer/** eureka: client: service-url: defaultZone: http://eureka1:50001/eureka/,http://eureka2:50002/eureka/ swagger: resources-provider: swagger-resources: - name: 用户消费者模块 url: /user-consumer/v2/api-docs - name: 用户提供者模块 url: /user-provider/v2/api-docs enabled: true -
效果图
附源码地址
- 码云 觉得好用的可以收藏下*.*


